As described in the Agent overview, the Agent designer in Formulate lets Pro users define agent personae, give it a set of instructions, assign MCP services and "tools" and provide external knowledge references that can act as an "autonomous entity."
The topic below delves into each of the designer elements in more detail.
Note: This feature requires specific licensing options.
Designer Elements
Instructions Tab
Agent instructions tell the agent how to behave and respond, defining both the agent's persona (what it is like) and its instructions (what it is supposed to do). You can specify the following details:
- Name: The name of the Agent. This name will be used for both the Agent object and its Model (the Decision Flow that contains the agent) when they are created.
- Persona: The character that we want the Agent to assume when it is fulfilling its instructions. This describes a simple, fictional user profile or job description that represents a typical target user's goals, behaviors, and needs.
- Instructions: This is the most important information for the Agent. It describes what the Agent needs to do; what it needs to look at, how to analyze that content, and what it needs to return. You should consider using lists or keeping your instructions in sequence to make sure that you cover everything. Also, be aware that if you use Tools or References, it might be a good idea to indicate how and when to use their content here.
Tools Tab
Open the Tools Selector
How you open the Tools Selector depends on whether you have any Tools Selected:
- If there are no tools selected, click Click here to start adding tools in the middle of the page.
- Otherwise, click Add Tools at the top-right.
Select MCP Tools
MCP service and tools bring external capabilities to the AI agent. When you add an MCP tool, you can incorporate functionality and data from other third technologies, extending your agent's capabilities with services that are specific to your requirements
You can select MCP Services or Tools as follows:
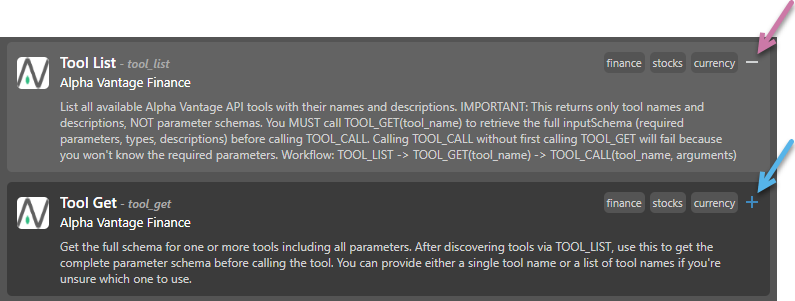
- Click the Plus (+) icon (blue arrow above) to select the Tool you want to add.
- Click the Minus (–) icon (purple arrow) to remove a selection.
Tip: If you want to remove all currently selected MCP tools, you can always click Clear All.
Note: It's important to note that the agent may try to make use of any selected tool, even if it is not explicitly mentioned in the Instructions.
Selected Tools
Once you have selected all the Tools that you want to make use of, click Selected Tools from the top-left of the page to return to the previous page.
References Tab
References are documents (images, PDFs, spreadsheets, and so on) that the agent can use. When you add a referenced document, you are typically providing the agent with some specific domain or company information. You can manage the reference files as follows:
Add Reference Files
- Drag the file from its folder location and drop it onto the target.
- Click the target to access the Open dialog, where you can navigate to the file's folder location and select the file.
Remove Reference Files
- Click Remove (X) to delete a single reference file.
- Click Clear All to remove all reference files.
Tip: If you want to remove all currently selected reference files, you can always click Clear All.
Note: It's important to note that the agent may try to make use of any selected reference file, even if it is not explicitly mentioned in the Instructions.
Settings Tab
The Settings tab is used to set up the Metadata for the new Agent:
- Icon: Use this widget to upload an image to assign as the item's thumbnail when viewed in the CMS. The options allow you to upload or remove images.
- Description: Optionally, provide a description to help your team quickly understand the purpose of the item and any relevant details in the future. This is central to building out a data catalog of data and analytic assets inside Pyramid.
- Tags: Use this multi-select dropdown list to tag this content item. Content tags help when trying to search and categorize content.
Pyramid Marketplace
Use the Pyramid Marketplace dialog to populate your form with data from built-in Agent templates that are included out of the box with the product deployment.

Each template in the Marketplace typically has a name, description, and some tags (orange highlight above). The available options are as follows:
- Download: Click Download (purple arrow) to close the marketplace and populate the builder with the data from your selected template.
- Tags Search... Select one or more tags from the dropdown list (yellow arrow) to show only the templates that include those tags. Note: The tags associated with each template are shown beneath the template name and description (blue arrow).
- Search: Type a search term to search using a contains filter across tags, title, and description.